LangChain LCEL & Runnable 완전 정복
Step 1. LCEL이 존재하는 이유 — 내부 동작 원리부터
1-1. LangChain의 버전 변화
LangChain은 v0.1.0 이후 대규모 리팩토링을 거치면서 LCEL(LangChain Expression Language) 을 공식 표준 문법으로 채택함. 이전 방식인 LLMChain, SequentialChain 같은 레거시 클래스들은 점차 deprecated 방향으로 가고 있고, 현재는 LCEL 방식이 공식 권장 방식임.
1-2. 기존 방식의 문제점
# ❌ 레거시 방식 - LLMChain 사용
from langchain.chains import LLMChain
from langchain.prompts import PromptTemplate
from langchain_openai import ChatOpenAI

llm = ChatOpenAI()
prompt = PromptTemplate(
    input_variables=["country"],
    template="{country}의 수도는 어디야?"
)

# 체인을 클래스 인스턴스로 만들어야 함
chain = LLMChain(llm=llm, prompt=prompt)
result = chain.run(country="대한민국")
이 방식의 문제점:
- 체인을 조합할 때 코드가 기하급수적으로 복잡해짐
- 중간 단계를 추가/수정하려면 클래스 구조 전체를 바꿔야 함
- 병렬 처리, 스트리밍, 비동기 처리 등을 따로 구현해야 함
- 디버깅이 어려움
1-3. LCEL이 해결하는 것들
# ✅ LCEL 방식
chain = prompt | llm | output_parser

# 스트리밍도 그냥 됨
for chunk in chain.stream({"country": "대한민국"}):
    print(chunk, end="", flush=True)

# 비동기도 그냥 됨
result = await chain.ainvoke({"country": "대한민국"})

# 배치 처리도 그냥 됨
results = chain.batch([
    {"country": "대한민국"},
    {"country": "미국"},
    {"country": "일본"}
])
LCEL로 체인을 한 번만 정의해두면 invoke / stream / ainvoke / abatch 등 모든 실행 방식이 자동으로 지원됨.
1-4. | 파이프 연산자의 내부 동작
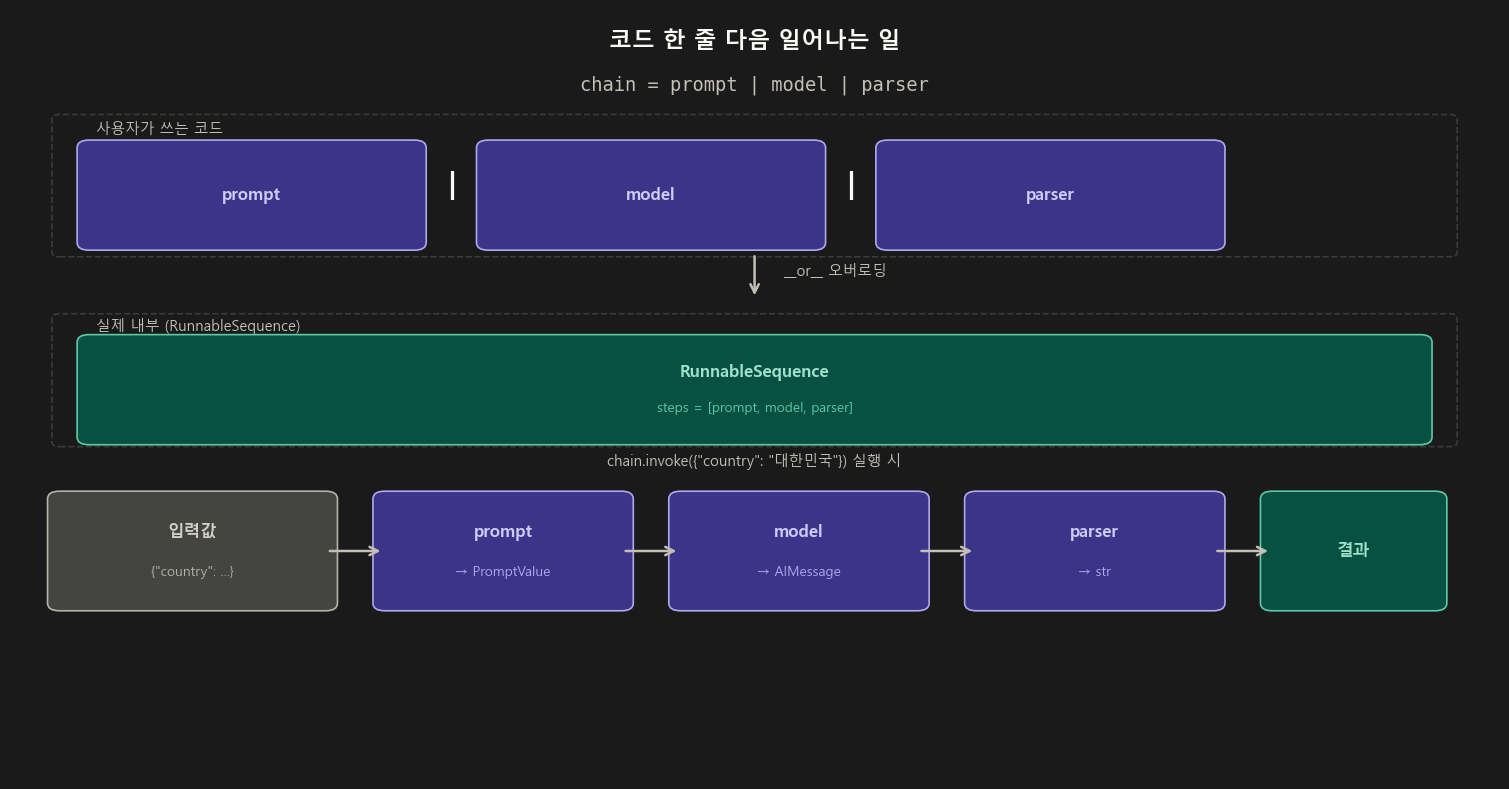
| 연산자는 파이썬의 __or__ 메서드를 오버로딩한 것임.
prompt | model을 작성하는 순간 내부에서 RunnableSequence(steps=[prompt, model])이 생성됨.
# 이 두 코드는 완전히 동일함
chain = prompt | model | parser

from langchain_core.runnables import RunnableSequence
chain = RunnableSequence(first=prompt, middle=[model], last=parser)
체인이 길어지면:
chain = prompt | model | output_parser
# 내부적으로
# RunnableSequence(steps=[prompt, model, output_parser])
Step 2. Runnable 인터페이스 — LCEL의 근간
LCEL에서 |로 연결 가능한 모든 컴포넌트는 Runnable 인터페이스를 구현하고 있음.
PromptTemplate, ChatOpenAI, OutputParser 모두 Runnable임.
2-1. Runnable이 제공하는 공통 메서드
| 메서드 | 설명 | 사용 예 |
|---|---|---|
invoke(input) |
단일 입력, 동기 실행 | 일반적인 단건 호출 |
stream(input) |
단일 입력, 스트리밍 출력 | 실시간 타이핑 효과 |
batch(inputs) |
다수 입력, 병렬 처리 | 대량 데이터 처리 |
ainvoke(input) |
단일 입력, 비동기 실행 | FastAPI 등 async 환경 |
astream(input) |
단일 입력, 비동기 스트리밍 | async 환경 실시간 출력 |
abatch(inputs) |
다수 입력, 비동기 병렬 처리 | async 대량 처리 |
chain = prompt | model | output_parser

# 1. invoke - 기본 동기 호출
result = chain.invoke({"country": "대한민국"})

# 2. stream - 스트리밍 (토큰 단위로 실시간 출력)
for chunk in chain.stream({"country": "대한민국"}):
    print(chunk, end="", flush=True)

# 3. batch - 여러 입력을 한번에
results = chain.batch([
    {"country": "대한민국"},
    {"country": "미국"},
    {"country": "일본"}
])
# max_concurrency로 동시 실행 수 제어 가능
results = chain.batch([...], config={"max_concurrency": 3})

# 4. ainvoke - 비동기
import asyncio
result = asyncio.run(chain.ainvoke({"country": "대한민국"}))
Step 3. 기본 체인 구성 — 상세 실습
3-1. 환경 설정
# 필요한 패키지 설치
# pip install langchain langchain-openai langchain-core python-dotenv

import os
from dotenv import load_dotenv

load_dotenv()  # .env 파일에서 OPENAI_API_KEY 로드
# 또는 직접 설정
os.environ["OPENAI_API_KEY"] = "sk-..."
3-2. PromptTemplate 심화
from langchain.prompts import PromptTemplate, ChatPromptTemplate
from langchain_core.messages import SystemMessage, HumanMessage

# 방법 1. from_template() - 가장 간단
prompt = PromptTemplate.from_template("{country}의 수도는 어디야?")

# 방법 2. 명시적으로 변수 선언
prompt = PromptTemplate(
    input_variables=["country"],
    template="{country}의 수도는 어디야?"
)

# 방법 3. ChatPromptTemplate - 역할(Role) 지정 가능
chat_prompt = ChatPromptTemplate.from_messages([
    ("system", "당신은 세계 지리 전문가입니다. 간결하게 답변해주세요."),
    ("human", "{country}의 수도는 어디야?")
])

# 방법 4. 메시지 객체 직접 사용
chat_prompt = ChatPromptTemplate.from_messages([
    SystemMessage(content="당신은 세계 지리 전문가입니다."),
    HumanMessage(content="{country}의 수도는 어디야?")
])

# 프롬프트 미리 확인하기 (format_messages)
formatted = chat_prompt.format_messages(country="대한민국")
print(formatted)
# [SystemMessage(content='당신은 세계 지리 전문가입니다.'),
#  HumanMessage(content='대한민국의 수도는 어디야?')]
3-3. 모델 설정 심화
from langchain_openai import ChatOpenAI

# 기본 설정
model = ChatOpenAI()

# 상세 설정
model = ChatOpenAI(
    model="gpt-4o",           # 모델 선택
    temperature=0,            # 0: 일관된 답변 / 1: 창의적 답변
    max_tokens=512,           # 최대 토큰 수
    streaming=True,           # 스트리밍 기본 활성화
)
3-4. OutputParser 종류와 활용
from langchain_core.output_parsers import (
    StrOutputParser,                    # AIMessage → 순수 문자열
    JsonOutputParser,                   # JSON 형식으로 파싱
    CommaSeparatedListOutputParser      # 콤마 구분 리스트
)

# StrOutputParser: 가장 기본, AIMessage에서 .content만 추출
chain = prompt | model | StrOutputParser()
result = chain.invoke({"country": "대한민국"})
print(type(result))   # <class 'str'>
print(result)         # "대한민국의 수도는 서울입니다."

# JsonOutputParser: 모델이 JSON으로 응답하도록 유도
from langchain_core.output_parsers import JsonOutputParser
from langchain_core.pydantic_v1 import BaseModel, Field

# 응답 스키마 정의
class CountryInfo(BaseModel):
    capital: str = Field(description="수도 이름")
    population: str = Field(description="인구 수")

parser = JsonOutputParser(pydantic_object=CountryInfo)

prompt = PromptTemplate(
    template="{country}의 수도와 인구를 알려줘.\n{format_instructions}",
    input_variables=["country"],
    partial_variables={"format_instructions": parser.get_format_instructions()}
)

chain = prompt | model | parser
result = chain.invoke({"country": "대한민국"})
print(result)
# {'capital': '서울', 'population': '약 5,170만 명'}
Step 4. RunnablePassthrough — “입력을 그대로 흘려보낸다”
4-1. 기본 동작 원리
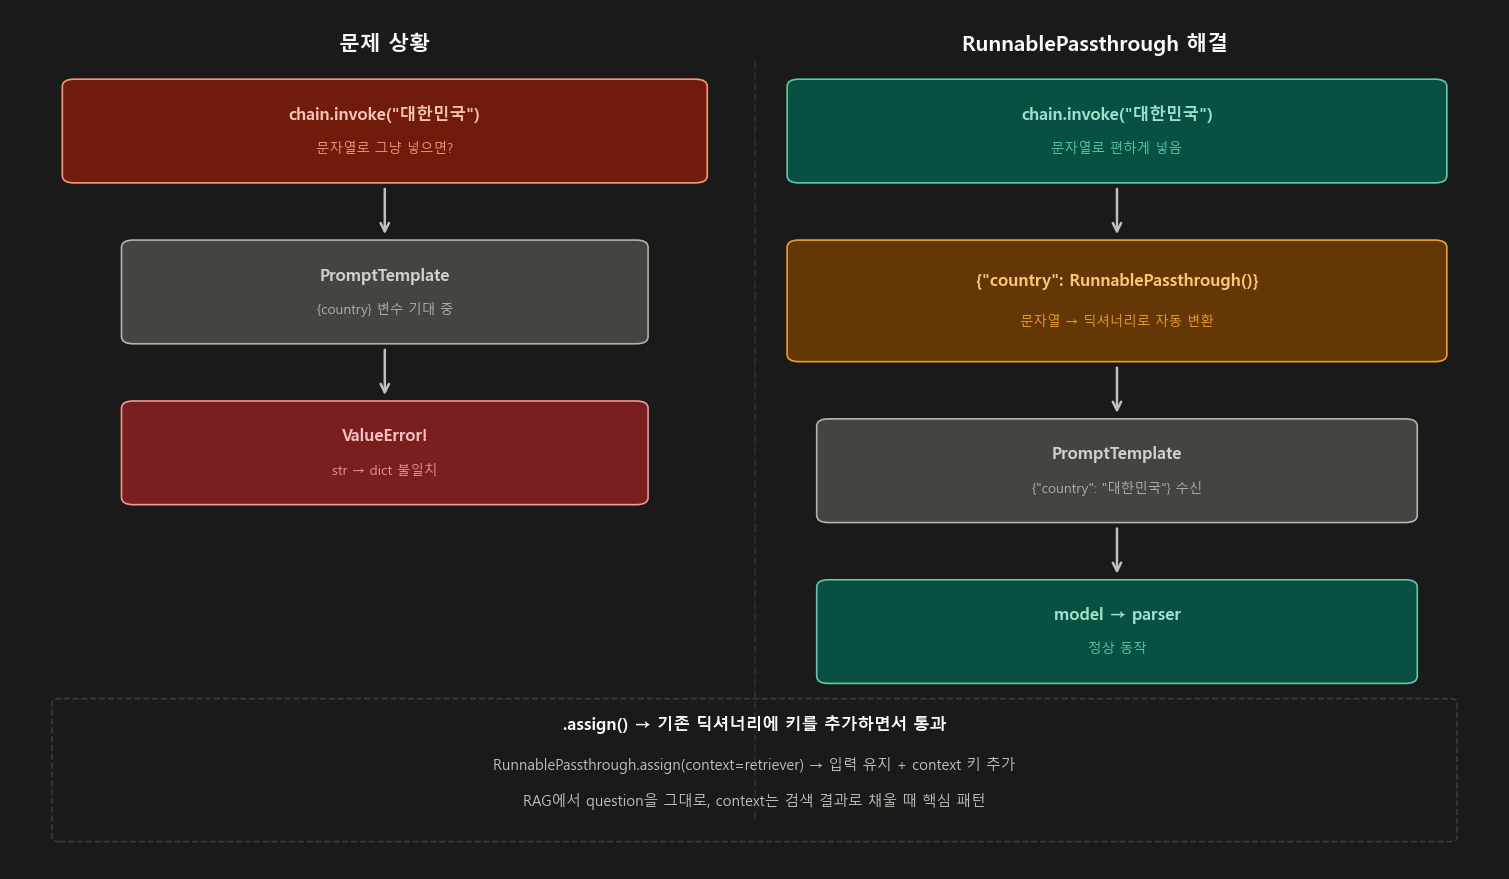
RunnablePassthrough는 입력을 아무런 변환 없이 그대로 다음 단계로 전달함.
딕셔너리 입력의 경우 그 딕셔너리를 그대로, 문자열 입력의 경우 그 문자열을 그대로 통과시킴.
from langchain_core.runnables import RunnablePassthrough

# 단독으로 테스트
passthrough = RunnablePassthrough()
result = passthrough.invoke("hello")
print(result)  # "hello" - 그대로 통과

result = passthrough.invoke({"key": "value"})
print(result)  # {"key": "value"} - 그대로 통과
4-2. 딕셔너리 내부에서의 활용 패턴
import os
from dotenv import load_dotenv
from langchain_core.runnables import RunnablePassthrough
from langchain.prompts import PromptTemplate
from langchain_openai import ChatOpenAI
from langchain_core.output_parsers import StrOutputParser

load_dotenv()
model = ChatOpenAI(model="gpt-4o-mini", temperature=0)
parser = StrOutputParser()
prompt = PromptTemplate.from_template("{country}의 수도는?")

# ── 패턴 1: 문자열 입력을 특정 키로 매핑 ──────────────────────────
chain = {"country": RunnablePassthrough()} | prompt | model | parser
result = chain.invoke("대한민국")   # 딕셔너리 없이 문자열만
print(result)  # "대한민국의 수도는 서울입니다."

# ── 패턴 2: 여러 키 중 일부만 passthrough ─────────────────────────
prompt2 = PromptTemplate.from_template(
    "{country}의 수도는? 답변 언어: {language}"
)

chain2 = {
    "country": RunnablePassthrough(),   # 입력 그대로
    "language": lambda _: "영어"        # 고정값 (람다 활용)
} | prompt2 | model | parser

result2 = chain2.invoke("대한민국")
print(result2)  # "The capital of South Korea is Seoul."
4-3. RunnablePassthrough.assign() — 기존 딕셔너리에 키 추가
assign()은 입력 딕셔너리를 그대로 유지하면서 새로운 키-값을 추가하는 매우 유용한 메서드임.
from langchain_core.runnables import RunnablePassthrough

# 기본 assign 사용
runnable = RunnablePassthrough.assign(
    extra_info=lambda x: f"{x['country']}에 대한 추가 정보"
)

result = runnable.invoke({"country": "대한민국"})
print(result)
# {
#   "country": "대한민국",                       ← 기존 키 유지
#   "extra_info": "대한민국에 대한 추가 정보"    ← 새 키 추가
# }

# ── RAG에서 가장 많이 쓰는 패턴 ──────────────────────────────────
# question은 그대로 두고, context만 retriever로 채워 넣는다
rag_chain = (
    RunnablePassthrough.assign(
        context=lambda x: retriever.invoke(x["question"])
        #                 ↑ 입력 딕셔너리에서 question 꺼내서 검색
    )
    | prompt   # 이제 {"question": ..., "context": ...} 가 prompt로 들어감
    | model
    | parser
)
result = rag_chain.invoke({"question": "서울의 인구는?"})
Step 5. RunnableParallel — “여러 체인을 동시에 실행”
5-1. 병렬 실행의 내부 원리
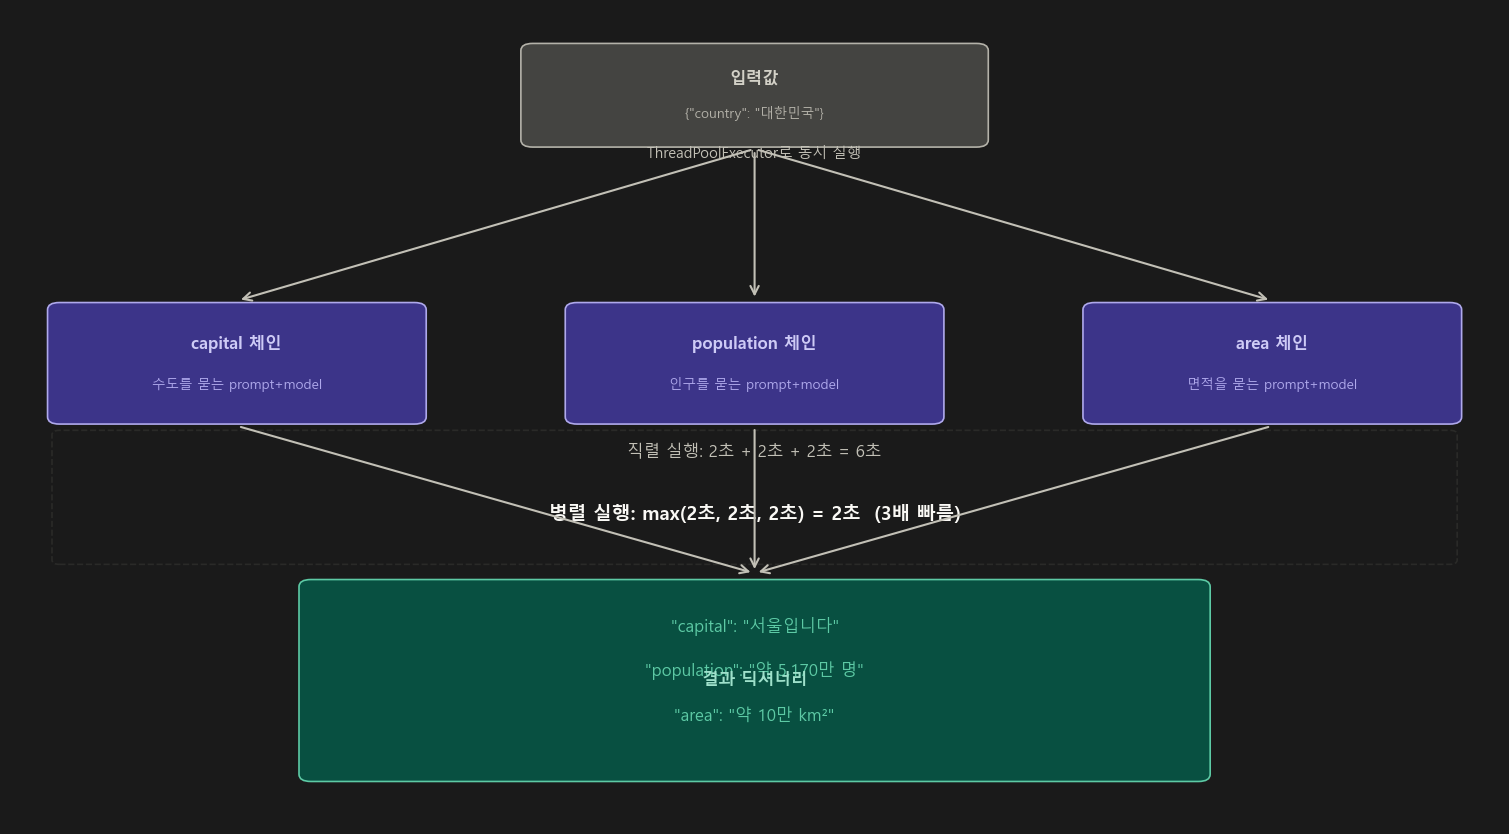
RunnableParallel은 내부적으로 Python의 ThreadPoolExecutor 를 사용해서 여러 체인을 동시에 실행함.
각 체인은 독립적인 스레드에서 실행되므로, 가장 오래 걸리는 체인의 시간이 전체 시간이 됨.
# 직렬 실행 시간: 2초 + 2초 + 2초 = 6초
# 병렬 실행 시간: max(2초, 2초, 2초) = 2초  →  3배 빠름
5-2. 세 가지 동일한 작성 방법
from langchain_core.runnables import RunnableParallel
from langchain.prompts import PromptTemplate
from langchain_openai import ChatOpenAI
from langchain_core.output_parsers import StrOutputParser

model = ChatOpenAI(model="gpt-4o-mini", temperature=0)
parser = StrOutputParser()

# ── 세 개의 독립 체인 정의 ────────────────────────────────────────
capital_chain    = PromptTemplate.from_template("{country}의 수도는?") | model | parser
population_chain = PromptTemplate.from_template("{country}의 인구는?") | model | parser
area_chain       = PromptTemplate.from_template("{country}의 면적은?") | model | parser

# 방법 1: RunnableParallel 클래스 명시
map_chain = RunnableParallel(
    capital=capital_chain,
    population=population_chain,
    area=area_chain
)

# 방법 2: 딕셔너리 문법 (실무에서 가장 많이 씀)
map_chain = {
    "capital":    capital_chain,
    "population": population_chain,
    "area":       area_chain
}

# 방법 3: .assign() 으로 점진적으로 추가
map_chain = RunnableParallel(capital=capital_chain).assign(
    population=population_chain,
    area=area_chain
)

# ── 실행 ─────────────────────────────────────────────────────────
result = map_chain.invoke({"country": "대한민국"})
print(result)
# {
#   "capital":    "대한민국의 수도는 서울입니다.",
#   "population": "대한민국의 인구는 약 5,170만 명입니다.",
#   "area":       "대한민국의 면적은 약 100,363 km²입니다."
# }
5-3. 중첩 체인 구성 (Nested Chain)
from langchain_core.runnables import RunnableParallel, RunnablePassthrough
from langchain.prompts import PromptTemplate
from langchain_openai import ChatOpenAI
from langchain_core.output_parsers import StrOutputParser

model = ChatOpenAI(temperature=0)
parser = StrOutputParser()

# 1단계: 각각 수도, 인구, 면적을 묻는 체인
capital_chain = (
    PromptTemplate.from_template("{country}의 수도는?")
    | model | parser
)
population_chain = (
    PromptTemplate.from_template("{country}의 인구는?")
    | model | parser
)
area_chain = (
    PromptTemplate.from_template("{country}의 면적은?")
    | model | parser
)

# 2단계: 3개를 병렬로 묶음
parallel_chain = RunnableParallel(
    capital=capital_chain,
    population=population_chain,
    area=area_chain
)

# 3단계: 병렬 결과를 받아서 최종 요약 체인
summary_prompt = PromptTemplate.from_template(
    """다음 정보를 바탕으로 {country}에 대한 소개 글을 작성해줘:
    - 수도: {capital}
    - 인구: {population}
    - 면적: {area}
    """
)

# 4단계: 전체 파이프라인 연결
# parallel_chain 결과 딕셔너리 + 원래 country 키를 합쳐서 summary_prompt에 넣기
final_chain = (
    RunnablePassthrough.assign(
        capital=capital_chain,
        population=population_chain,
        area=area_chain
    )
    | summary_prompt
    | model
    | parser
)

result = final_chain.invoke({"country": "대한민국"})
print(result)
5-4. 실행 시간 측정으로 병렬 효과 확인
import time
from langchain_core.runnables import RunnableParallel

# 직렬 실행
start = time.time()
r1 = capital_chain.invoke({"country": "대한민국"})
r2 = population_chain.invoke({"country": "대한민국"})
r3 = area_chain.invoke({"country": "대한민국"})
serial_time = time.time() - start
print(f"직렬 실행 시간: {serial_time:.2f}초")  # 약 3~4초

# 병렬 실행
start = time.time()
result = RunnableParallel(
    capital=capital_chain,
    population=population_chain,
    area=area_chain
).invoke({"country": "대한민국"})
parallel_time = time.time() - start
print(f"병렬 실행 시간: {parallel_time:.2f}초")  # 약 1~1.5초
Step 6. RunnableLambda — “커스텀 함수를 체인에 끼우기”
RunnableLambda는 Python 함수를 체인의 한 단계로 변환하는 래퍼임.
중간 데이터 가공이 필요한 모든 곳에 사용함.
6-1. 기본 사용법
from langchain_core.runnables import RunnableLambda

# 일반 함수를 Runnable로 변환
def double(x: int) -> int:
    return x * 2

runnable = RunnableLambda(double)
print(runnable.invoke(5))  # 10

# 람다 함수도 사용 가능
runnable = RunnableLambda(lambda x: x.upper())
print(runnable.invoke("hello"))  # "HELLO"
6-2. 체인 중간에 삽입하는 패턴
from langchain_core.runnables import RunnableLambda, RunnableParallel
from langchain_core.output_parsers import StrOutputParser
from langchain.prompts import PromptTemplate
from langchain_openai import ChatOpenAI

model = ChatOpenAI(model="gpt-4o-mini", temperature=0)
parser = StrOutputParser()

# ── Step 1: 병렬 체인으로 두 가지 정보를 동시에 가져옴 ───────────
parallel = RunnableParallel(
    capital=(
        PromptTemplate.from_template("{country}의 수도는?") | model | parser
    ),
    population=(
        PromptTemplate.from_template("{country}의 인구는?") | model | parser
    )
)

# ── Step 2: 두 결과를 하나의 문자열로 합치는 커스텀 함수 ──────────
def merge_results(data: dict) -> str:
    # parallel의 결과는 {"capital": "...", "population": "..."} 딕셔너리
    return f"수도 정보: {data['capital']}\n인구 정보: {data['population']}"

# ── Step 3: 최종 교정 프롬프트 ──────────────────────────────────
refine_prompt = PromptTemplate.from_template(
    "다음 내용을 이모티콘을 곁들여 자연스럽게 다듬어줘:\n{merged}"
)

# ── Step 4: 전체 파이프라인 ──────────────────────────────────────
chain = (
    parallel
    | {"merged": RunnableLambda(merge_results)}   # 함수를 체인 단계로 삽입
    | refine_prompt
    | model
    | parser
)

print(chain.invoke({"country": "대한민국"}))
# "🇰🇷 대한민국의 수도는 서울입니다! 인구는 약 5,170만 명으로..."
6-3. RunnableLambda로 전처리/후처리 구현
from langchain_core.runnables import RunnableLambda

# 전처리: 사용자 입력 정제
def preprocess_input(user_input: str) -> dict:
    """입력 문자열을 정제하고 딕셔너리로 변환"""
    cleaned = user_input.strip().lower()
    return {"country": cleaned, "timestamp": "2024-01"}

# 후처리: 결과 포매팅
def postprocess_output(ai_message) -> dict:
    """AIMessage를 딕셔너리로 변환"""
    return {
        "answer": ai_message.content,
        "tokens_used": ai_message.response_metadata.get("token_usage", {})
    }

chain = (
    RunnableLambda(preprocess_input)      # 전처리
    | prompt
    | model
    | RunnableLambda(postprocess_output)  # 후처리
)

result = chain.invoke("  대한민국  ")
print(result)
# {
#   "answer": "대한민국의 수도는 서울입니다.",
#   "tokens_used": {"prompt_tokens": 20, "completion_tokens": 15, ...}
# }
6-4. @chain 데코레이터 — RunnableLambda의 축약형
LangChain은 함수를 Runnable로 만드는 @chain 데코레이터도 제공함.
from langchain_core.runnables import chain

# @chain 데코레이터를 붙이면 자동으로 RunnableLambda가 됨
@chain
def my_custom_chain(user_input: str) -> str:
    # 이 안에서 다른 체인을 자유롭게 호출 가능
    topic = (
        PromptTemplate.from_template("{input}의 주제는?") | model | parser
    ).invoke({"input": user_input})
    result = (
        PromptTemplate.from_template("{topic}에 대해 자세히 설명해줘") | model | parser
    ).invoke({"topic": topic})
    return result

# Runnable처럼 사용 가능
result = my_custom_chain.invoke("LCEL이란?")

# ── @chain 데코레이터로 만든 Runnable도 파이프라인에 연결 가능 ────
@chain
def my_custom_step(data: dict) -> str:
    return data["capital"] + " / " + data["population"]

chain_v2 = parallel | my_custom_step | refine_prompt | model | parser
Step 7. 실전 RAG 파이프라인 — 전체 구현
전체 흐름
전체 코드 (단계별 주석 포함)
# ── 설치 ──────────────────────────────────────────────────────────
# pip install langchain langchain-openai langchain-community faiss-cpu python-dotenv

import os
from dotenv import load_dotenv
load_dotenv()

from langchain_core.runnables import RunnablePassthrough
from langchain.prompts import ChatPromptTemplate
from langchain_openai import ChatOpenAI, OpenAIEmbeddings
from langchain_community.vectorstores import FAISS
from langchain_core.output_parsers import StrOutputParser

# ════════════════════════════════════════════
# Step 1. 벡터 스토어 구성 (문서를 임베딩해서 저장)
# ════════════════════════════════════════════
texts = [
    "대한민국의 수도는 서울입니다.",
    "서울의 인구는 약 950만 명입니다.",
    "서울은 한강을 중심으로 발전한 도시입니다.",
    "부산은 대한민국 제2의 도시이며 항구로 유명합니다.",
    "대전은 대한민국의 과학기술 중심도시입니다.",
]

# 텍스트를 벡터(숫자 배열)로 변환 후 FAISS에 저장
vectorstore = FAISS.from_texts(texts, OpenAIEmbeddings())

# retriever: 질문과 가장 유사한 문서를 찾아주는 객체
# k=2 → 가장 관련 있는 문서 2개를 반환
retriever = vectorstore.as_retriever(search_kwargs={"k": 2})


# ════════════════════════════════════════════
# Step 2. 프롬프트 구성
# ════════════════════════════════════════════
prompt = ChatPromptTemplate.from_messages([
    (
        "system",
        """당신은 친절한 안내 AI입니다.
반드시 아래 제공된 문서를 참고하여 답변하세요.
문서에 없는 내용은 '문서에서 찾을 수 없습니다'라고 답하세요.

[참고 문서]
{context}"""
    ),
    ("human", "{question}")
])


# ════════════════════════════════════════════
# Step 3. 문서 포맷터 함수 (RunnableLambda 역할)
# ════════════════════════════════════════════
def format_docs(docs) -> str:
    """retriever가 반환한 Document 객체 리스트를 하나의 문자열로 합침"""
    return "\n\n".join(doc.page_content for doc in docs)


# ════════════════════════════════════════════
# Step 4. RAG 체인 구성
# ════════════════════════════════════════════
model  = ChatOpenAI(model="gpt-4o-mini", temperature=0)
parser = StrOutputParser()

rag_chain = (
    # 핵심 패턴: assign으로 question 유지 + context 추가
    RunnablePassthrough.assign(
        context=lambda x: format_docs(retriever.invoke(x["question"]))
        #        ↑ 입력 딕셔너리에서 question을 꺼내 검색 → 결과를 context에 저장
    )
    | prompt   # {"question": "...", "context": "..."} 두 키를 모두 받음
    | model
    | parser
)


# ════════════════════════════════════════════
# Step 5. 실행 및 확인
# ════════════════════════════════════════════
questions = [
    "서울의 인구는 얼마인가요?",
    "부산은 어떤 도시인가요?",
    "대전의 특징은 무엇인가요?",
    "독도는 어디에 있나요?"  # 문서에 없는 질문
]

for q in questions:
    answer = rag_chain.invoke({"question": q})
    print(f"Q: {q}")
    print(f"A: {answer}\n")

# ── 스트리밍으로 실시간 출력 (실서비스 패턴) ─────────────────────
print("스트리밍 답변:")
for chunk in rag_chain.stream({"question": "서울에 대해 알려주세요"}):
    print(chunk, end="", flush=True)
Step 8. 고급 패턴 — 실전 활용
8-1. 디버깅 헬퍼 (중간 단계 결과 확인)
실무에서 체인이 예상대로 작동하지 않을 때 중간 값을 확인하는 가장 빠른 방법임.
from langchain_core.runnables import RunnableLambda

def debug(data, label="DEBUG"):
    """체인 중간에 삽입해서 중간 결과를 출력하는 함수"""
    print(f"\n{'='*40}")
    print(f"[{label}] 타입: {type(data).__name__}")
    print(f"[{label}] 값: {data}")
    print(f"{'='*40}\n")
    return data  # 반드시 입력을 그대로 반환해야 다음 단계로 전달됨

rag_chain_debug = (
    RunnablePassthrough.assign(
        context=lambda x: format_docs(retriever.invoke(x["question"]))
    )
    | RunnableLambda(lambda x: debug(x, "프롬프트 직전 입력"))
    | prompt
    | RunnableLambda(lambda x: debug(x, "모델 직전 입력"))
    | model
    | parser
)
8-2. 에러 처리 패턴
# ── .with_fallbacks(): 실패 시 대체 모델로 자동 전환 ─────────────
primary  = ChatOpenAI(model="gpt-4o")
fallback = ChatOpenAI(model="gpt-4o-mini")

# gpt-4o 호출 실패 시 자동으로 gpt-4o-mini 시도
robust_model = primary.with_fallbacks([fallback])

chain = prompt | robust_model | parser

# ── .with_retry(): 일시적 오류 시 자동 재시도 ────────────────────
robust_chain = (prompt | model | parser).with_retry(
    stop_after_attempt=3,         # 최대 3회 시도
    wait_exponential_jitter=True  # 재시도 간격을 지수적으로 증가
)
8-3. 조건 분기 체인
from langchain_core.runnables import RunnableBranch, RunnableLambda

# 언어에 따라 다른 프롬프트 사용
korean_chain = PromptTemplate.from_template("한국어로 답변해줘: {question}") | model | parser
english_chain = PromptTemplate.from_template("Answer in English: {question}") | model | parser
default_chain = PromptTemplate.from_template("{question}") | model | parser

branch_chain = RunnableBranch(
    (lambda x: x.get("language") == "korean", korean_chain),
    (lambda x: x.get("language") == "english", english_chain),
    default_chain  # 기본값
)

# 사용
result = branch_chain.invoke({"question": "수도는?", "language": "korean"})
result = branch_chain.invoke({"question": "What is the capital?", "language": "english"})
8-4. 실행 설정 — RunnableConfig
from langchain_core.runnables import RunnableConfig

config = RunnableConfig(
    tags=["production", "v2"],          # 로깅 태그
    metadata={"user_id": "user_123"},   # 메타데이터
    max_concurrency=5,                  # 최대 동시 실행 수
    callbacks=[...],                    # 콜백 (로깅, 트레이싱 등)
    run_name="my_chain_run"             # 실행 이름 (LangSmith 등에서 표시)
)

result = chain.invoke({"country": "대한민국"}, config=config)
8-5. LangSmith 트레이싱
import os
os.environ["LANGCHAIN_TRACING_V2"] = "true"
os.environ["LANGCHAIN_API_KEY"] = "your-langsmith-api-key"
os.environ["LANGCHAIN_PROJECT"] = "my-project"

# 이후 모든 chain.invoke()가 자동으로 LangSmith에 기록됨
result = chain.invoke({"country": "대한민국"})
# LangSmith 대시보드에서 전체 실행 흐름, 각 단계 입출력, 소요 시간 확인 가능
8-6. 중간 단계 결과 확인 — .assign() 활용
from langchain_core.runnables import RunnablePassthrough

# 중간 결과를 계속 들고 다니면서 최종적으로 모든 단계 결과 확인
debug_chain = (
    RunnablePassthrough.assign(
        prompt_result=lambda x: prompt.invoke(x)
    )
    | RunnablePassthrough.assign(
        model_result=lambda x: model.invoke(x["prompt_result"])
    )
)

result = debug_chain.invoke({"country": "대한민국"})
print(result.keys())
# dict_keys(['country', 'prompt_result', 'model_result'])
Step 9. 실서비스 패턴 — 대화 히스토리가 있는 RAG
from langchain_core.runnables import RunnablePassthrough
from langchain.prompts import ChatPromptTemplate, MessagesPlaceholder
from langchain_core.messages import HumanMessage, AIMessage

# 대화 히스토리를 포함하는 프롬프트
prompt_with_history = ChatPromptTemplate.from_messages([
    ("system", "문서를 참고해 답변하세요:\n{context}"),
    MessagesPlaceholder(variable_name="chat_history"),  # 이전 대화 삽입
    ("human", "{question}")
])

rag_with_history = (
    RunnablePassthrough.assign(
        context=lambda x: format_docs(retriever.invoke(x["question"]))
    )
    | prompt_with_history
    | model
    | parser
)

# 대화 히스토리를 누적하면서 호출
chat_history = []
while True:
    user_input = input("질문: ")
    if user_input == "종료":
        break

    answer = rag_with_history.invoke({
        "question":     user_input,
        "chat_history": chat_history
    })
    print(f"AI: {answer}\n")

    # 히스토리에 이번 대화 추가
    chat_history.append(HumanMessage(content=user_input))
    chat_history.append(AIMessage(content=answer))
Step 10. 종합 예시 — 뉴스 분석 파이프라인
지금까지 배운 개념을 모두 활용한 뉴스 요약 + 감성 분석 + 키워드 추출 동시 처리 파이프라인임.
from langchain_core.runnables import (
    RunnableParallel,
    RunnablePassthrough,
    RunnableLambda
)
from langchain.prompts import ChatPromptTemplate
from langchain_openai import ChatOpenAI
from langchain_core.output_parsers import StrOutputParser, JsonOutputParser
from langchain_core.pydantic_v1 import BaseModel, Field

model = ChatOpenAI(model="gpt-4o", temperature=0)
str_parser = StrOutputParser()

# 스키마 정의
class SentimentResult(BaseModel):
    sentiment: str = Field(description="긍정/부정/중립")
    score: float = Field(description="감성 점수 0.0~1.0")
    reason: str = Field(description="판단 이유")

json_parser = JsonOutputParser(pydantic_object=SentimentResult)

# 요약 체인
summary_chain = (
    ChatPromptTemplate.from_messages([
        ("system", "주어진 텍스트를 3줄로 요약해주세요."),
        ("human", "{text}")
    ])
    | model | str_parser
)

# 감성 분석 체인
sentiment_chain = (
    ChatPromptTemplate.from_messages([
        ("system", f"텍스트의 감성을 분석해주세요.\n{json_parser.get_format_instructions()}"),
        ("human", "{text}")
    ])
    | model | json_parser
)

# 키워드 추출 체인
keyword_chain = (
    ChatPromptTemplate.from_messages([
        ("system", "텍스트에서 핵심 키워드 5개를 쉼표로 구분해서 추출해주세요."),
        ("human", "{text}")
    ])
    | model | str_parser
)

# 모두 병렬로 실행
analysis_chain = RunnableParallel(
    original=RunnablePassthrough(),     # 원본 텍스트 그대로 보존
    summary=summary_chain,              # 요약
    sentiment=sentiment_chain,          # 감성 분석
    keywords=keyword_chain              # 키워드 추출
)

# 최종 리포트 생성
def create_report(data: dict) -> str:
    original  = data["original"]["text"]
    summary   = data["summary"]
    sentiment = data["sentiment"]
    keywords  = data["keywords"]

    return f"""
📰 분석 리포트
{'='*50}
📝 원문 (일부): {original[:100]}...

📋 요약:
{summary}

🎭 감성 분석:
  - 감성: {sentiment['sentiment']}
  - 점수: {sentiment['score']:.2f}
  - 이유: {sentiment['reason']}

🔑 핵심 키워드: {keywords}
{'='*50}
    """.strip()

final_chain = analysis_chain | RunnableLambda(create_report)

# 실행
news_text = """
대한민국 경제가 올해 3분기 기준 전년 동기 대비 2.1% 성장했다고
한국은행이 발표했습니다. 반도체 수출 회복세가 주요 원인으로 분석되며,
내수 소비도 점차 회복되는 추세입니다. 다만 고금리 기조가 지속되면서
부동산 시장과 소상공인 부문에서는 여전히 어려움이 이어지고 있습니다.
"""

result = final_chain.invoke({"text": news_text})
print(result)
핵심 정리
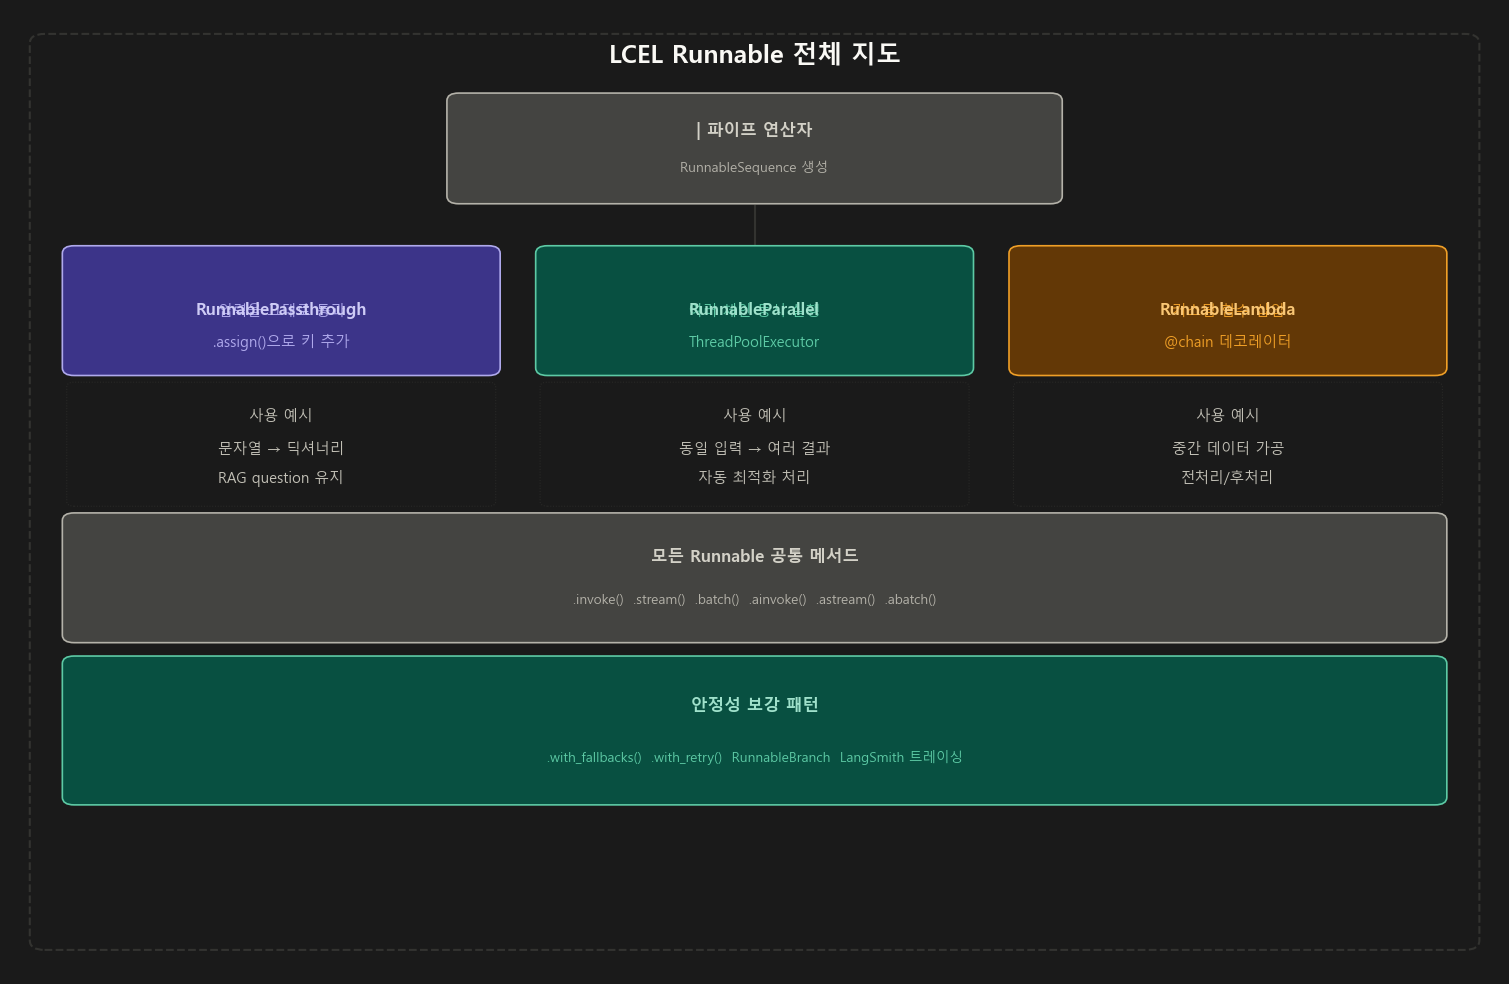
┌──────────────────────────────────────────────────────────────┐
│                    LCEL 핵심 구성요소                         │
├──────────────────┬───────────────────────────────────────────┤
│ | (파이프)        │ 단계를 순서대로 연결 (RunnableSequence 생성)│
├──────────────────┼───────────────────────────────────────────┤
│ Passthrough      │ 입력을 그대로 통과 / .assign()으로 키 추가  │
├──────────────────┼───────────────────────────────────────────┤
│ Parallel         │ 여러 체인을 ThreadPool로 동시 실행          │
├──────────────────┼───────────────────────────────────────────┤
│ Lambda           │ 커스텀 Python 함수를 체인에 삽입            │
├──────────────────┼───────────────────────────────────────────┤
│ Branch           │ 조건에 따라 다른 체인으로 분기              │
├──────────────────┼───────────────────────────────────────────┤
│ with_fallbacks() │ 실패 시 대체 체인으로 자동 전환             │
├──────────────────┼───────────────────────────────────────────┤
│ with_retry()     │ 일시적 오류 시 자동 재시도                  │
└──────────────────┴───────────────────────────────────────────┘
실무 적용 치트시트
| 상황 | 쓸 것 | 코드 패턴 |
|---|---|---|
| 문자열 입력을 딕셔너리 키로 넣고 싶을 때 | RunnablePassthrough |
{"key": RunnablePassthrough()} \| prompt |
| 입력 딕셔너리에 검색 결과를 추가할 때 (RAG) | .assign() |
RunnablePassthrough.assign(context=retriever) |
| 수도·인구·면적을 한 번에 물어볼 때 | RunnableParallel |
{"a": chain1, "b": chain2} |
| 두 결과를 하나의 문자열로 합칠 때 | RunnableLambda |
RunnableLambda(merge_fn) |
| 중간 결과를 콘솔에 찍어 디버깅할 때 | RunnableLambda |
체인 중간에 debug 함수 삽입 |
| 체인 전체를 함수처럼 정의하고 싶을 때 | @chain 데코레이터 |
@chain def my_fn(x): ... |
| 조건에 따라 다른 체인으로 분기할 때 | RunnableBranch |
RunnableBranch((조건, 체인), ..., 기본체인) |
| API 호출 실패 시 백업 모델 쓸 때 | .with_fallbacks() |
primary.with_fallbacks([fallback]) |
| 일시적 오류 시 자동 재시도할 때 | .with_retry() |
.with_retry(stop_after_attempt=3) |
| 스트리밍 응답이 필요할 때 | .stream() |
for chunk in chain.stream(input): |
| FastAPI 등 비동기 환경에서 쓸 때 | .ainvoke() |
await chain.ainvoke(input) |
| 전체 실행 흐름을 추적하고 싶을 때 | LangSmith | LANGCHAIN_TRACING_V2=true 환경변수 설정 |
결론: LCEL은 단순히 문법을 바꾼 것이 아니라, 스트리밍·비동기·병렬·배치 처리를 모두 통일된 인터페이스로 제공하는 아키텍처의 변화임.
가장 중요한 습관은|로 연결된 코드를 볼 때 “앞 단계의 출력 타입이 뒷 단계의 입력 타입과 맞는가?” 를 항상 확인하는 것임. 타입 불일치가 95%의 오류 원인임.
Comments